Big Blue Setup: Difference between revisions
No edit summary |
|||
| Line 205: | Line 205: | ||
===Step 3 Spread Out & Fold=== | ===Step 3 Spread Out & Fold=== | ||
RULE 1 NEVER, EVER, STEP ON THE ROOF! The material is lightweight nylon, stepping on it will cause severe wear and shorten its life. | |||
Now find the crows foot rings and use them to spread out the roof. Pull the roof out flat and as wrinkle free as possible. See figure # | Now find the crows foot rings and use them to spread out the roof. Pull the roof out flat and as wrinkle free as possible. See figure # | ||
| Line 212: | Line 212: | ||
Once the roof is spread out flip the crows feet in on top to the roof as in figure # | Once the roof is spread out flip the crows feet in on top to the roof as in figure # | ||
Then fold the roof in bringing the edges to the poles as in figure #. Repeat the fold twice more until the roof is a narrow strip. See figure#. | Then fold the roof in bringing the edges to the poles as in figure #. Repeat the fold twice more until the roof is a narrow strip. See figure#. | ||
===Step 4 Drop the Poles=== | ===Step 4 Drop the Poles=== | ||
Revision as of 11:53, 21 April 2009
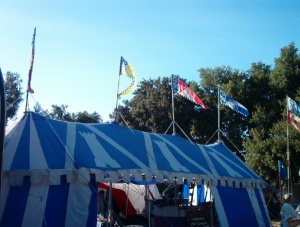
When Baron Leo made the requirement that the Dreiburgen Baronial Pavilion should be possible to erect it with as few as two persons. Big Blue’s design engineer Lord Aladric of Litchfield decided to take that requirement one step further and design a large group pavilion that was possible for one person to setup.
Looks are deceiving
Most people look at Big Blue and think that it is a massively hard tent to put up. Many of these same people will also gladly put up a Tentmaster or a Panther Pavilion thinking that it’s easier than Big Blue setup. How wrong they are.
When these people look at Big Blue they only see its size and the ropes that streach out farther from the roof than the average Pavilion. What they are not looking at is the number of pieces that make up Big Blue or it’s mechanics.
Lets compare Big Blue to the oval marquee Panther Pavilion that Dreiburgen owns. This table is based on just setting the roof for day use.
| Big Blue | Panther Pavilion | |
|---|---|---|
| Roof Space | 12’ X 44’ | 13’ X 18’ |
| Number of poles | 4 | 20 |
| Number of tent stakes | 26 | 22 |
| Minimum people req. to setup | 1 | 3 |
As you can see, for its size Big Blue is a much simpler pavilion. I it was made in the Napoleonic style, like most Tentmaster’s Big Blue would probably require 52 tent stakes and 58 poles just to put the roof up.
The Easiest Pavilion in the Known World
There are a number of things that make Big Blue easer to setup than most pavilions one third it’s size.
- First of course is the use of modern materials in a period design. The use of UV coated fire retardant rip stop nylon reduced the weight and bulk down to less than one third that of canvas. Had we used canvas or even a thicker synthetic it would be imposable for the roof to be handled as a single piece.
- Second of all Big Blue uses a period rope system referred to as Crow’s Feet . A single rope from one tent stake branches out in to two or more holding points. On Big Blue each Crow’s Foot converts one staked rope into four tension points. This cuts the number of tent stakes in half while increasing holding strength. (This is also why Big Blue can stand in winds up to 75 MPH)
- Third is the rope and pulley system. No struggling to stand poles up with tent material draped over them. Simply stand the poles up, and then hoist the roof in to position.
Time Allowance
How long does it take to setup Big Blue? That depends on who’s helping. With Big Blue less is more. It can be put up faster with 3 people who will take their time than with 20 people that are in a hurry. The ideal setup crew is 6 to 8 people
| Crew | Roof Only | Roof and Walls |
|---|---|---|
| 6 with experience | 15 minutes | 30 minutes |
| 6 that need instructions | 30 minutes | 1 hour |
| 1 person | 1 hour | 3 hours |
| 20 who wont listen to instructions | all day | Don’t bother just give up |
Setup Procedure
NOTE: these setup procedures are based on the pavilion having been packed up properly the last time it was used.
- RULE 1 NEVER, EVER, STEP ON THE ROOF! The material is lightweight nylon, stepping on it will cause savvier wear and shorten its life.
Step 1 Establish the site
- The stake perimeter is a 30’ wide X 66’ long with round ends. The entire area does not need to be completely clear obstacles can be worked around (see further down).
- The area that falls with in the walls is about 15’ X 46’
- The center poles are 22 feet tall
- The Ridge of the tent is 15 feet high.
- The tent stakes are 15 feet out from the center
Decide where you want to put up Big Blue. For example: If you wanted Blues tent stakes 5 feet from the eric, then lay out the
- In the cans are two measuring with marks and loops to help you layout the stakes and make the pavilion easier and faster to put up. Sometimes you will have a fool on the setup crew that will say, “We don’t have time for those measuring ropes”. If this happens politely inform him that his services are not required. It is easier to set up Big Blue by yourself than to have a person like that on your crew.
Step 2 set the stakes
- Place the roof in the center of where you wish to put Blue up and remove it from the bag. Then fold it out as in figure 1. Notice that Front and Back are written on the roof next to the rings.
- Use the measuring ropes to help you position 4 tent stakes as in figure 2.
- Then reposition the measuring ropes as in figure 3 and drive in tent stakes next to each piece of colored tape.
- Set the four corner stakes as shown in figure 4
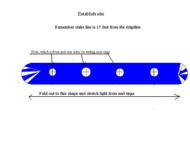 figure 1 |
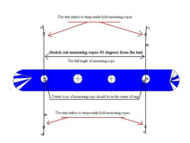 figure 2 |
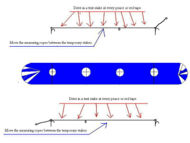 figure 3 |
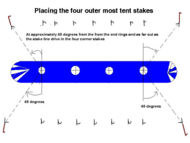 figure 4 |
Step 3 Raise the Poles
Each center pole has 4 holding ropes and 1 haul up rope
- RULE 1 NEVER, EVER, STEP ON THE ROOF! The material is lightweight nylon, stepping on it will cause savvier wear and shorten its life.
- Unwrap the ropes from around the center sections of each center pole lay out and assemble the poles as shown in figure 5.
- Secure the haul up rope so that it does not slide to the top during setup
- Hook 3 of the 4 holding ropes to their stakes as shown in figure 5 and use the 4th to hoist up the pole.
- If you are doing this step by yourself, Make sure the holding ropes are secure and that the rope across from you is drawn up short so you cant pull the pole over on top of yourself. Use a tent stake at the bottom of the pole to keep it from sliding and place the top of the pole on a chair to make lifting the pole easer.
- Repeat procedure on the next three poles (Do not worry about getting the poles straight until all 4 are up)
- Straighten the poles by sighting down the line and shifting the bottom of the poles first. Once the bottoms line up then adjust the tops by using the ropes. When finished it shpuld look figure 6.
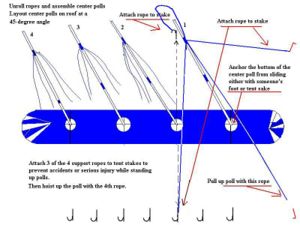 figure 5 |
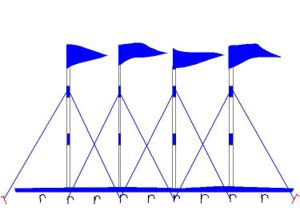 figure 6 |
Step 4 Hoist the Roof
- RULE 1 NEVER, EVER, STEP ON THE ROOF! The material is lightweight nylon, stepping on it will cause savvier wear and shorten its life.
- Hook haul up rope to chains in the rings figure 7.
- Thread the hauling ropes through the center rings of the roof.
- RULE 2: DO NOT ALLOW THE ROPE TO DRAG ON THE MATERIAL IT WILL BURN A HOLE IN THE ROOF!!!
- Hoist up the roof. Figure 8.
- If you are doing this step by yourself you will need raise the roof in stagses, moving from pole to pole.
- Note: DO NOT ALLOW THE ROPE TO DRAG ON THE MATERIAL IT WILL BURN A HOLE IN THE ROOF!!!
- If you are doing this step by yourself you will need raise the roof in stagses, moving from pole to pole.
- Now check the ridge of the roof. It should be straight. If it sages or drapes readjust the top of the poles.
| Error creating thumbnail: File missing figure 7 |
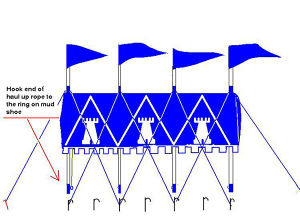 figure 8 |
Did we mention NOT TO ALLOW THE ROPE TO DRAG ON THE MATERIAL? IT WILL BURN A HOLE IN THE ROOF!!!
Step 5 Spread out the Roof
- Attach the tension ropes to the 26 Crows foot rings. See figure 9 (At this step 26 volunteers would be very handy)
- Pull each Crows foot rope straight out from the Pavilion and attach to the stake there. See figure 10
- After the sides are spread out proceed with the ends. Take the measuring ropes and clip the center loop to the base of the end poles, it’s length will set the distance for the remaining tent stakes.
- Each end has 5 Crows Feet. Start with the center and work back and forth. See figure 11
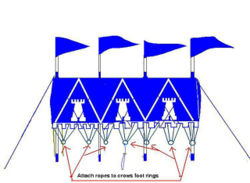 figure 9 |
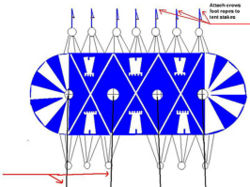 figure 10 |
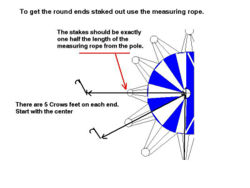 figure 11 |
Step 6 Clear the cluter
The holding ropes that allow the center poles to stand before the roof was raised are no longer necessary, unless there are high winds. However they are now crisscrossing in front and back of the pavilion blocking walking paths and creating a tripping hazard much like a Dragonwing. Refer to figure 8.
- Undo the holding ropes and move them over to tent stakes that are strait down from each center pole. This will undo the spider wed effect and open up the pavilion. See figure 12 .
 figure 8 |
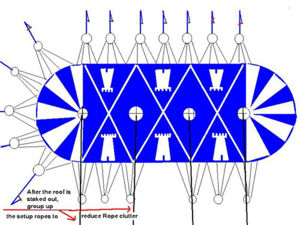 figure 12 |
Obstacles
Big Blue is sizable but it can fit in places that you might not think it can.
The stake perimeter may be 30’ wide X 66’ long, but the tent walls only need 15’ X 46’. If the walls are not to be used Big Blue can be erected over some obstacles. Big Blue has been set over picnic tables, boulders, sapling trees, even concrete and asphalt pavement smaller than its stake perimeter.
The poles are 22 feet high but if trees have low branches the top section and banner can be left off reducing the poles to 16 feet. The roof ridge is 15 feet however it does not have to be drawn up to its full height. This fact is not only useful for low branches is necessary in high winds where the up wind end is set slightly lower then the down wind end.
In the case of extreme weather the roof can be lowered to a height of 6 feet and the crows feet rings can be staked directly to the ground to reduce wind resistance while still having a small amount of roof to protect gear or a few people from the storm. The engineers refer to this position as “hurricane mode”.
The 30’ wide X 66’ long stake perimeter does not need to be complete clear (See Figures 13 & 14). Stakes can be moved slightly left of right to get around objects.
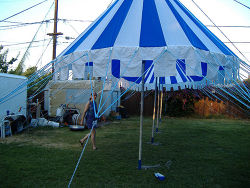 figure 13 |
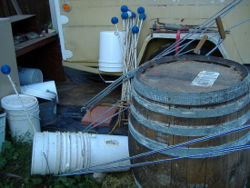 figure 14 |
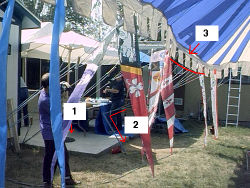 figure 15 |
In Figures 13,14 & 15 Big Blue is setup in Baron Malcolm Alberic Back yard. His yard is less than 60 feet long and his garden shed and back porch are in the way on the placement of 4 tent stake positions. Some stakes had to be repositioned however in figure 15 the concrete porch is to large for that to be an obtion.
The Stake should be at point 1 in figure 15 It can be left out however the roof at point 3 will sag. Solution, The rope is redirected by the eric pole at point 2. To set up Big Blue in Malcolm back yard this method needs to be used at the porch and the back fence. Note using an eric pole to redirect ropes makes their hold weaker see the slight sag at point 3 in figure 15.
Take Down
The note at the beginning of the setup section states “these setup procedures are based on the pavilion having been packed up properly the last time it was used.”
Step 1 Saftey
The setup ropes were grouped during the “Clear the clutter” step so they must be spread back out First before any other rope is released. Otherwise the poles could fall and hurt someone See fig#
Step 2 Lower Away
After the setup ropes have been spread back out the crows feet can be unhooked from the tent stakes, the ropes removed and rolled back up. Once the roof is hanging loose simply unhook the haul up ropes and lower the roof to the ground like figure # Note: if you are doing this step alone you will need to do this in stages lowering partway and tying off as you switch from pole to pole.
Step 3 Spread Out & Fold
RULE 1 NEVER, EVER, STEP ON THE ROOF! The material is lightweight nylon, stepping on it will cause severe wear and shorten its life.
Now find the crows foot rings and use them to spread out the roof. Pull the roof out flat and as wrinkle free as possible. See figure # Keep in mind that the cone shape on the ends will be wrinkled no mater what
Once the roof is spread out flip the crows feet in on top to the roof as in figure #
Then fold the roof in bringing the edges to the poles as in figure #. Repeat the fold twice more until the roof is a narrow strip. See figure#.
Step 4 Drop the Poles
First check the surrounding area to determine which of the four possible directions is clear and safe to lower the poles. Then loosen the four ropes slightly, unhook the rope directaly across form where you want the pole to land and lower slowly. Tips:
- Remember the bottom of the pole is not anchored to the ground so once the pole is lowered past 45 degrees the base can kick loose towards you. To guard against this place a tent stake at the base or have some one hold the base to block this action.
- When the pole is lowered to a height of two feet the angle of the pole and the rope becomes difficult to control. There are two ways to deal with this, One is to drop the pole the last two feet, the other is to have someone catch it.
- Never lower the poles with some one standing underneath, the poles are two inches thick and made of solid oak if you loose control of one it will come down with the force of a base ball bat in full swing, causing great injury.
- If someone is going to catch the poles before they hit the ground that person should wait to one side until you lower the pole to shoulder height then they can walk up to and take the pole from you safely.
Step 5 Pack Up
Now that the poles are down, draw up the ropes as short as possible and group them into one bundle. Then wrap around the center section of the pole like a candy cane. See figure #. This method keeps tangling to a minimum.
It is now possible to finish folding the roof, to do this take each end and fold into the center as shown figure#. Repeat until roof bundle is small enough to fit into the storage bag.